CKAD Dumps Deutsch, CKAD Prüfungs
Wiki Article
Außerdem sind jetzt einige Teile dieser PrüfungFrage CKAD Prüfungsfragen kostenlos erhältlich: https://drive.google.com/open?id=1LasXJtPdl9YFbvmMo1wXlR_NbuPe6mZC
Viele Kandidaten, die sich auf die Linux Foundation CKAD Zertifizierungsprüfung vorbereiten, haben auf anderen Websites auch die Online-Ressourcen zur Linux Foundation CKAD Zertifizierungsprüfung gesehen. Aber unser PrüfungFrage ist eine einzige Website, die von den professionellen IT-Experten nach den Nachschlagen bearbeiteten Linux Foundation CKAD Prüfungsfragen und Antworten bieten. Wir versprechen, das Sie mit unseren Schulungsunterlagen die Linux Foundation CKAD Zertifizierungsprüfung beim ersten Versuch bestehen können.
Die CKAD -Zertifizierungsprüfung ist eine wertvolle Zertifizierung für Entwickler, die ihre Karriere in der Entwicklung von Kubernetes -Anwendungen vorantreiben möchten. Es wird weltweit als Benchmark für die Fähigkeiten zur Entwicklung von Kubernetes anerkannt und ist in der Branche hoch angesehen. Die Zertifizierung bietet Entwicklern die Möglichkeit, potenziellen Arbeitgebern und Kunden ihr Know -how zu demonstrieren, und kann ihnen helfen, sich in einem wettbewerbsfähigen Arbeitsmarkt abzuheben.
Linux Foundation CKAD Prüfungs, CKAD Deutsche Prüfungsfragen
Wollen Sie Linux Foundation CKAD Zeritifizierungsprüfung ablegen? Wollen Sie die Linux Foundation CKAD Zertifizierung bekommen? Wie können Sie ohne sehr gute Vorbereitung diese Prüfung ablegen? Tatsächlich gibt es eine Weise für Sie, in sehr beschränkter Zeit die Linux Foundation CKAD Prüfung leicht zu bestehen. Was können Sie machen? Es ist erreichbar, dass Sie die Linux Foundation CKAD Dumps von PrüfungFrage benutzen.
Die Linux Foundation CKAD (Linux Foundation Certified Kubernetes Application Developer) Zertifizierungsprüfung ist eine hochbegehrte Zertifizierung für Fachleute, die ihre Expertise im Entwurf und der Implementierung von Anwendungen auf Kubernetes demonstrieren möchten. Kubernetes ist eine Open-Source-Plattform, die die Bereitstellung, Skalierung und Verwaltung von containerisierten Anwendungen automatisiert. Die CKAD-Zertifizierung ist darauf ausgelegt, die Fähigkeiten des Kandidaten in der Entwicklung und Bereitstellung von Kubernetes-Anwendungen zu validieren.
Linux Foundation Certified Kubernetes Application Developer Exam CKAD Prüfungsfragen mit Lösungen (Q75-Q80):
75. Frage
You are managing a Kubernetes cluster running a highly-available application that uses a custom resource called 'Orders. The 'orders resource is created and managed by a custom controller that ensures the order processing workflow runs flawlessly. However, the 'order' resource's validation rules have changed, requiring a new schema to be applied. How can you ensure that the existing 'Order' resources conform to the new schema without disrupting the application's functionality?
Antwort:
Begründung:
See the solution below with Step by Step Explanation.
Explanation:
Solution (Step by Step) :
I). Define the New Schema:
- Create a new CustomResourceDefinition (CRD) file with the updated schema for the 'Order' resource.
- Ensure that the CRD's 'spec-validation.openAPlV3Schema' field includes all the new validation rules.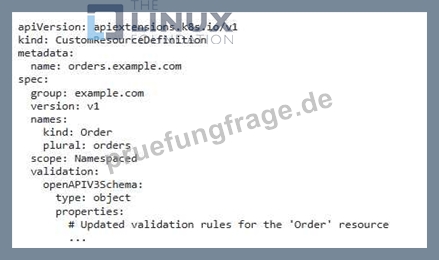
2. Update the CRD: - Apply the new CRD definition using 'kubectl apply -f order-crd.yaml'. 3. Create a Webhook for Validation: - Define a webhook in your Kubernetes cluster that will be responsible for validating the 'order' resources against the new schema. - Configure the webhook to be invoked during resource creation and update operations.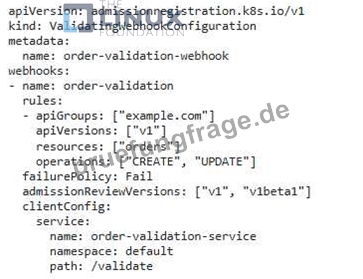
4. Deploy the Validation Service: - Create a deployment for the validation service that implements the logic for validating the 'Order' resources against the new schema. - The service should expose an endpoint that the webhook can communicate with.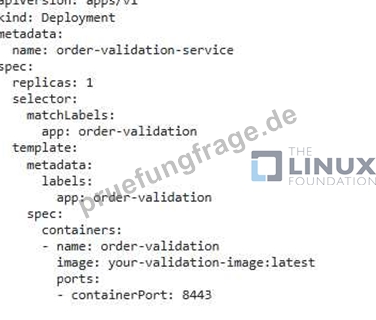
5. Reconcile Existing Resources: - Once the validation webhook and service are deployed, create a temporary job that iterates through all existing 'Order resources. - The job snould validate each resource against tne new schema and automatically update any resources that do not comply.
By following these steps, you can ensure that your 'order' resources conform to the new schema without disrupting the application's functionality The validation webhook prevents new invalid resources from being created, and the reconciliation job ensures that existing resources are updated to meet the new schema requirements. This approach allows for smooth schema evolution and maintains the consistency of your data.,
76. Frage
You are deploying a microservice application that requires secure access to an external database. The database credentials are stored as environment variables Within the application container. You want to create a Kubernetes secret that securely stores these credentials and can be mounted as a file in the container.
Antwort:
Begründung:
See the solution below with Step by Step Explanation.
Explanation:
Solution (Step by Step) :
1. Create a Kubernetes Secret:
- Create a YAML file, for example, 'database-secret.yamr , with the following content: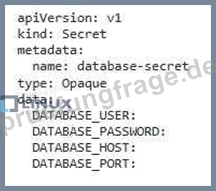
- Replace ". ". ". and with the actual values, Base64 encoded. You can use the 'base64' command to encode the values: bash echo "your _ username" | base64 echo 'Your_password" | base64 echo "your _ host" | base64 echo "your _ port" | base64 2. Apply the Secret: - Apply the secret to your Kubernetes cluster: bash kubectl apply -f database-secret.yaml 3. Modify the Deployment: - Modify your Deployment YAML file to mount the secret as a file: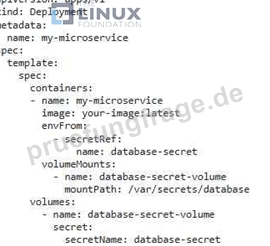
4. Apply the Updated Deployment: - Apply the updated Deployment YAML file using: bash kubectl apply -f my-microservice-deployment.yaml 5. Accessing Credentials: - The application container can now access the environment variables from the secret using 'process-env-DATABASE USER , 'process.env.DATABASE_PASSWORD', etc. Additionally, the secret data is mounted as a file at '/var/secrets/database'.
77. Frage
You are developing a microservices application and want to deploy it to Kubernetes using Helm. You have two services: 'user-service and 'order-service. The 'order-service depends on the "user-service'. How would you use Helm to manage these deployments, ensuring that the 'order- service' only starts after the 'user-service' is successfully deployed and running?
Antwort:
Begründung:
See the solution below with Step by Step Explanation.
Explanation:
Solution (Step by Step) :
1. Create a Helm Chart for Each Service:
- 'user-service' chart:
- Create a 'values.yamr file for the 'user-service' chart.
- Define the container image, resources, and any other necessary configurations for the 'user-service'.
- 'order-service' chart:
- Create a 'values-yamr file for the 'order-service' chart
- Define the container image, resources, and any other necessary configurations for the 'order-service'
- In tne 'values.yamr, add a dependency on the 'user-service' chart.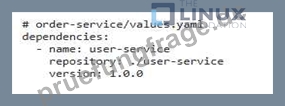
2. Configure Helm for Dependency Management: - Use the '-dependency-update' flag to ensure that Helm automatically updates the 'user-service chart before deploying the 'order-service' bash helm dependency update order-service 3. Deploy the Services Using Helm: - Deploy the 'user-service chart: bash helm install user-service Juser-service - Deploy the 'order-service' chart: bash helm install order-service ./order-service - Helm will automatically handle the dependency between the services, ensuring that the 'user-services is deployed before the 'order-service' 4. Verify Deployment and Dependency: - Use ' kubectl get pods -l app=user-service' and 'kubectl get pods -l app=order-service' to verify that the pods are running. - You Should observe that the 'user-service' pods are up and running before the 'order-services pods start. - You can also use 'kubectl describe pod' to see the pod events and confirm that the 'order-service' pod is waiting for the 'user-service' to be ready before starting.,
78. Frage
You are tasked with deploying a complex application using Helm. The application consists of multiple microservices, each with its own deployment and service. To simplify the deployment and management of these microservices, you need to implement a mecnanism that allows you to automatically create and manage namespaces based on the name of the Helm release.
Antwort:
Begründung:
See the solution below with Step by Step Explanation.
Explanation:
Solution (Step by Step) :
1. Create a Custom Helm Chart:
- Begin by creating a custom Helm chart named 'my-app-chart' to manage the application's multiple microservices.
2. Implement a Namespace Creation Function:
- Within the 'my-app-chafltemplatesr directory, create a file named 'namespace-yamr and define the namespace creation function.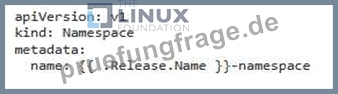
- This function uses the Helm release name to dynamically generate a namespace with the format '-namespace' 3. Add the Namespace to the Chan: - Modify the 'my-app-chart/templates/service.yamr and 'my-app-chart/templates/deployment_yamr for each microservice to ensure the deployments and services reside within the dynamically created namespace: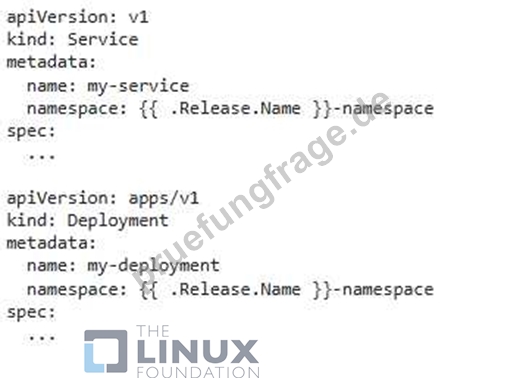
4. Deploy the Chart with Different Releases: - Use tne following command to deploy tne chart with different releases, each creating a separate namespace: bash nelm install release1 my-app-chart helm install release2 my-app-chart - This will create namespaces release1-namespace' and release2-namespace , each containing the deployments and services of the respective releases. 5. Manage and Clean Up: - To manage and clean up the deployments and namespaces, you can use regular Helm commands within the context or each namespace: bash kubectl --namespace release1 -namespace get pods helm delete release1 kubectl delete namespace release1-namespace - This approach provides a structured and automated method for managing multiple microservices within separate namespaces using Helm releases.,
79. Frage
You have a Deployment that runs a critical service with 5 replicas. You need to update the service with a new image, but you want to ensure that only one replica is unavailable at a time during the update process. You also want to control how long the update process can take. How would you implement this using the 'rollinglJpdate' strategy?
Antwort:
Begründung:
See the solution below with Step by Step Explanation.
Explanation:
Solution (Step by Step) :
1. Update the Deployment YAMLI
- Set 'strategy.type' to 'RollingLJpdate'
- Configure 'strategy.rollingupdate.maxunavailable' to 'I' to limit the number of unavailable replicas during the update.
- Set 'strategy-rollinglJpdate.maxSurge' to to allow for a maximum of six replicas during the update process.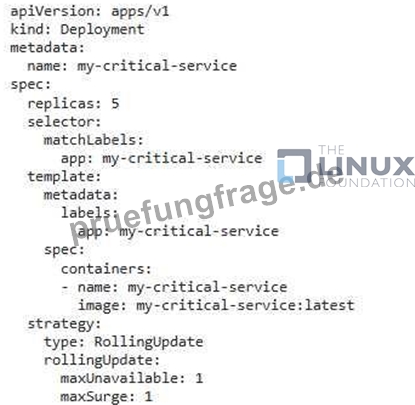
2. Control Update Duration (Optional): - Optionally, you can use 'strategy-rollingUpdate.partition' to control the number of pods updated at a time. This allows you to slow down the update process by updating fewer pods at once- For example, setting 'partition' to ' 2' would update only two pods at a time.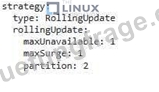
3. Create or IJpdate the Deployment: - Apply the updated YAML file using 'kubectl apply -f my-critical-service-deployment.yaml' 4. Trigger the Update: - Update the image of your application to a newer version. - You can trigger the update by pushing a new image to your container registry. 5. Monitor the Update: - Use 'kubectl get pods -I app=my-critical-service to monitor the pod updates during the rolling update process. - Observe the pods being updated one at a time, ensuring that there's always at least four replicas available. 6. Check for Successful Update: - Once the update is complete, use 'kubectl describe deployment my-critical-service' to verify that the 'updatedReplicaS field matches the 'replicas' field.,
80. Frage
......
CKAD Prüfungs: https://www.pruefungfrage.de/CKAD-dumps-deutsch.html
- CKAD Examengine ???? CKAD Pruefungssimulationen ⚗ CKAD Zertifizierungsfragen ???? Suchen Sie jetzt auf { de.fast2test.com } nach “ CKAD ” um den kostenlosen Download zu erhalten ????CKAD Fragenkatalog
- CKAD Zertifizierungsfragen ???? CKAD Deutsche ⏳ CKAD Fragenpool ???? Suchen Sie einfach auf ▷ www.itzert.com ◁ nach kostenloser Download von { CKAD } ????CKAD Fragenkatalog
- CKAD Zertifizierungsprüfung ➿ CKAD Dumps Deutsch ???? CKAD Fragenkatalog ???? Geben Sie 【 www.it-pruefung.com 】 ein und suchen Sie nach kostenloser Download von 「 CKAD 」 ????CKAD Zertifikatsdemo
- CKAD Übungsmaterialien - CKAD Lernführung: Linux Foundation Certified Kubernetes Application Developer Exam - CKAD Lernguide ???? Suchen Sie auf ⏩ www.itzert.com ⏪ nach kostenlosem Download von ▛ CKAD ▟ ????CKAD Fragen Antworten
- Die seit kurzem aktuellsten Linux Foundation CKAD Prüfungsinformationen, 100% Garantie für Ihen Erfolg in der Prüfungen! ???? URL kopieren ➥ de.fast2test.com ???? Öffnen und suchen Sie ⇛ CKAD ⇚ Kostenloser Download ????CKAD PDF Testsoftware
- CKAD Echte Fragen ???? CKAD Trainingsunterlagen ???? CKAD Echte Fragen ???? Suchen Sie jetzt auf ➥ www.itzert.com ???? nach 《 CKAD 》 und laden Sie es kostenlos herunter ????CKAD Zertifizierungsantworten
- CKAD Dumps ???? CKAD Trainingsunterlagen ???? CKAD Prüfungsmaterialien ???? Öffnen Sie die Webseite ▷ www.pass4test.de ◁ und suchen Sie nach kostenloser Download von 《 CKAD 》 ????CKAD Zertifizierungsantworten
- CKAD Zertifizierungsfragen ???? CKAD Examengine ???? CKAD Zertifizierungsfragen ???? Sie müssen nur zu ( www.itzert.com ) gehen um nach kostenloser Download von ▛ CKAD ▟ zu suchen ????CKAD PDF Testsoftware
- CKAD Deutsch Prüfungsfragen ???? CKAD Fragen Antworten ???? CKAD Zertifizierungsprüfung ???? Erhalten Sie den kostenlosen Download von ➠ CKAD ???? mühelos über 「 www.it-pruefung.com 」 ????CKAD Probesfragen
- CKAD Braindumpsit Dumps PDF - Linux Foundation CKAD Braindumpsit IT-Zertifizierung - Testking Examen Dumps ???? Suchen Sie jetzt auf { www.itzert.com } nach ➠ CKAD ???? um den kostenlosen Download zu erhalten ????CKAD Zertifizierungsfragen
- CKAD Braindumpsit Dumps PDF - Linux Foundation CKAD Braindumpsit IT-Zertifizierung - Testking Examen Dumps ???? Suchen Sie auf 【 www.echtefrage.top 】 nach kostenlosem Download von 【 CKAD 】 ????CKAD Zertifizierungsprüfung
- abelaqwi762012.tokka-blog.com, crossbookmark.com, charliejqmm371324.ssnblog.com, teganmomb756133.ktwiki.com, lilyypgq362731.wannawiki.com, sashavkli732514.thelateblog.com, jakubrxkf852816.gynoblog.com, jasonocis594201.izrablog.com, totalbookmarking.com, jeanpavo797690.lotrlegendswiki.com, Disposable vapes
P.S. Kostenlose 2026 Linux Foundation CKAD Prüfungsfragen sind auf Google Drive freigegeben von PrüfungFrage verfügbar: https://drive.google.com/open?id=1LasXJtPdl9YFbvmMo1wXlR_NbuPe6mZC
Report this wiki page